Are you a Quiet Speculation member?
If not, now is a perfect time to join up! Our powerful tools, breaking-news analysis, and exclusive Discord channel will make sure you stay up to date and ahead of the curve.
As promised, today we delve into the world of text-less alters. I want to begin by pointing out that there are some major differences in the process of full art extensions rather than border-less. First, and most obviously, the amount of art is almost doubled this way, and therefore needs a bit of planning. Second, this will take considerably more time. I must stress this point, as the further you go, the more opportunity there is for your patience to wear thin. Remember to take breaks, or, face burning out on this hobby. Conversely, the more time you can spend on a project like this, the more it will show in the artwork itself. Keep in mind though, that you want to consider your time (or your clients' time) against how much money can be reasonably made on your project. Six hours of work may produce an immaculate alter, but if you can only charge $15 or $20 than you have short-changed yourself.
Choosing a card...
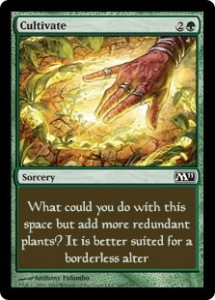 Choosing the right card can make or break your entire project. The proper card should have three properties:
1. A picture with room for extension.
2. A color palette that you feel comfortable with.
3. A picture that inspires you.
The first point is the most crucial. Some artwork is complete, and expresses what it needs to express so thoroughly that adding to it would be redundant and actually detract from the art. In addition, some art is done from a perspective that trying to extend it would look awkward. The key is to try and visualize how you would change or add to the card, and be honest with yourself as to whether it will work.
The second point is pretty straightforward. When choosing your first full art card, you want to be able to focus on the composition rather than trying to match the colors. As you become more experienced in color matching, this point will be less and less relevant, but always needs to be considered.
The final point may seem trivial, but what’s the point of sitting down to paint something if you can’t figure out what to paint? I have wasted so many hours trying to think of how to extend something because that particular card is popular. I could have (and should have) been using that time to alter less popular cards that inspired my imagination. At the very least I would have something to show for my time.
Introducing...
For today's project I will introduce two more colors to our battery of paints, Brilliant Orange and Unbleached Titanium. Both of these colors will save you some time mixing and in the case of Unbleached Titanium (Which is more of a cream color) will see a lot of work. Brilliant Orange happens to be a great starting point for fire and explosions. Both of these colors are instrumental in the extension of an Alloy Myr, which I have chosen for the project.
Pre-planning
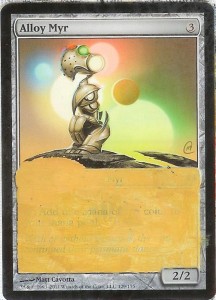 As I stated above, you'll want to have a basic idea of what you want to do before you begin. Whether this means sketching possibilities or simply mapping it out in your head is up to you. Sketching helps to make sure your composition is balanced, which is very important. Just because we are painting on a Magic card doesn't mean we can ignore the basic principles of design. For this particular project, I imagine that this myr is high above the landscape, which will provide us with a low horizon. The horizon is marked with high rising plateaus in the distance. The ground, being made of rusted metal will be a dark gray color. The suns seem to be setting which will cast long shadows toward the viewer. The myr appears to be steadfastly (if not adorably) guarding something on the lower branches, maybe a nest? Okay, I am aware that myr propagate so don’t fry me in the comments, but this particular myr looks to me like a bird so I'm going with it.
The rusted sky
The sky is probably the trickiest thing you'll have to do on this project. It is a mixture of our two new colors and the color of whatever sun is closest. To begin with though, you can lay down a base coat of Brilliant Orange and Unbleached Titanium. This first base coat is only to provide a foundation on which to apply color, so don’t worry if some of the words show through, they will be covered in time.
Now is the time where we decide how high or low our horizon is. This will give the viewer an idea of how high or low our myr is. I used a ruler to make sure I had a straight horizon to work with, and Unbleached Titanium to fill in the ground. Now then, take your mixture and add to it a touch of green for the sky nearest the green sun. Painting with a damp brush should help you blend the sky as you go, also remember that you can paint slightly 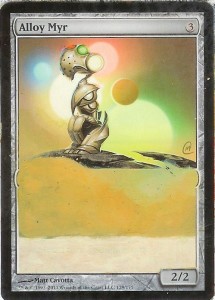 over the art to help give the colors more continuity. Be mindful of your horizon, but not afraid of it, some overlap is okay, as we are going to add some landscape to it anyway.
Are those still considered branches?
Now that we have our sky sorted out, it's time to fill in those branches. Using black paint, you can continue the branches all the way to the border. Remember that these “branches” are actually made of metal and resemble armor more than anything else, and this must be taken into account when “sketching” the rest. I once again used a wet brush, so the black paint did not cover well, in this case it worked to my advantage giving the impression of rust right from the bat.
Continuing with your black paint, draw in the landscape features on the horizon. Once that has dried, use Titanium White to create a dark grey with your black and fill in the rest of the ground. We can now bring the tone of the grey up a little and add some features to the plateaus. Try to imagine how the light is hitting these elements and that will tell you how and where to apply highlights. The ground was simply dry-brushed lightly with this color to give it some texture. I also added a couple of “trees” to fill in some of the negative space. Now using your black, you can dry-brush in shadows, once again considering how the light will strike the objects and cause it to cast its' shadows. We don’t want to add too much detail to the background; just enough to be credible if the viewer’s eye strays from our subject. This is a useful way to save time. Speaking of time, this is a 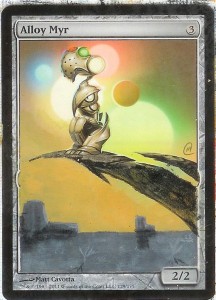 good time to wash out our brushes, let the painting set, and give ourselves a break.
To be continued...
Did I not mention that this is a two part article? Well now you know! Go outside and enjoy the fact that spring and summer are upon us! Next week we will discuss how to finish our myr and all the fun points that go along with that. If you want to finish yours early for bonus points then I would love to see them.
-The Painters' Servant
Twitter: PaintersServant
Email: Mbajorek02@gmail.com




Looking great so far. I hope the second part is up soon. If I come across an extra Alloy Myr I may just try this.
brilliant, as always.